|
|
Post by bearcat on Nov 11, 2009 10:51:22 GMT -5
This is an old build-up wood kit that I bought on E-bay a few months ago. It's been discontinued for some years now. I've always liked this sailplane. It's really beautiful.  I'm going to change mine in the build process though. Biggest change is that it's going to have electric power with a folding prop in the nose. That will help balance the plane with the more modern and lighter Lipo battery, since this plane was designed for a 4-cell nicad originally. The other big change I plan to make on the plane is to modify the wing for flaps and ailerons. Pat Tritle advised building in less dihedral if I install flaps and ailerons. As you can see, this wing is a polyhedral, but I will make the outer wing sections at zero degrees to the inner wing sections, to reduce my dihedral. The good news is that this is EXACTLY the same wing used in my other sailplane, the Gentle Lady. So if I want to fly just tail feathers, I only need to swap wings. This is going to be beautiful. I've got some monocote that looks like polished aluminum, or chrome. It's very glossy silver. The entire plane will be covered in that, but I would also like some dark blue highlights, particularly on the bottom of the wing so that I always know which way is up. The aircraft factory will gear up very soon, this month in fact. I have a lot of vacation time to burn up and will be off for about half of the remaining year. I'll probably get the sailplane done by new years. |
|
|
|
Post by bearcat on Nov 19, 2009 8:14:15 GMT -5
Here is the Gentle Lady sailplane with the same wing:  If I want this polyhedral flapless wing to look good on the Sophisticated Lady sailplane above, and have the wings interchangeable, I have to think about what colors would go good together. Unfortunately, a red wing on a silver/blue fuselage might look mismatched. So maybe I should change my color scheme to silver and red instead. Or silver and yellow. Something I have to think about. I think it's a good idea to have the Sophisticated Lady as a powered sailplane that has the option of flying just tail feathers...at least in the early stages while I'm learning. But eventually, I'll want to fly mainly flaps/ailerons. |
|
|
|
Post by Lt Swiss on Nov 19, 2009 22:58:25 GMT -5
|
|
|
|
Post by bearcat on Nov 21, 2009 9:30:50 GMT -5
Interesting. Those look like the have no dihedral at all. Anyway, I have this entire week off, and except for one day when I'd like to buzz down to Albuquerque to buy some race gas for my Vette, I should be around. I wouldn't mind if I fly every day, Mitch, I need the practice. So I'll be calling you. I have been thinking about the new sailplane build and how I'm going to be modifying it. I have already selected a motor and purchased it online from RC Hot Deals:  But take a close look at the nose of the Sophisticated Lady in the first pic above. I might have to do some modifying. I might be able to keep most of the shape of the nose intact, except that it will not come to as sharp a point as the nonpowered version. It'll have more of a bullet-nose shape. I looked for sharper spinners that would accept a folding prop, but did not find any. I did find some nice looking spun aluminum spinners.  This is what I need, a 4mm shaft size, but I have no clue how big it is. It is most likely 34 mm diameter, which is pretty common, and that's about an inch and a quarter. That size would work. The motor can take a variety of prop sizes. 10x7 offers the most speed, but also has really long prop blades. I'm thinking maybe 9x5 blades. Regarding the flap and aileron systems, I can hide the flap servo in the center of the wing hidden in the fuselage for lack of drag. The aileron servos are usually in the wing and they use a mixer. This increases drag but is the simplest method. However, like in my Curtiss Jenny, I can use bellcranks and hide the pushwires inside the wing and use a center servo just like the flaps, hidden inside the fuselage, which would be the most elegant, but more difficult to build. So I'll think about it. I think I'll start building this week if I have time around all the Thanksgiving preparations. |
|
|
|
Post by bearcat on Nov 21, 2009 10:51:22 GMT -5
Okay, I placed about a hundred bucks of orders online. I decided on the conventional wing servos for the ailerons with a mixer. The only thing I forgot is the flap servo. So if one of you has a powerful servo that you wanna sell me, talk to me.
|
|
|
|
Post by bearcat on Nov 22, 2009 23:03:35 GMT -5
Well I'm pretty much using up all my CA glue on the Gentle Lady repair, so I need some glue guys. What can you suggest?
There are no damn hobby shops for over a hundred mile radius. Ordering stuff is fine, but it takes too long to get anything. I don't like building a new wing out of CA anyway because it's so brittle that it does not flex at all. So what you get in a bad crash is wood breaking, not flexing. The reason my Gentle Lady did not get damaged worse is because I used a glue called Ambroid. This is something I had left over from my childhood freeflight model days, and found it. I had enough left to use it on the red Stinson Voyager, but now I'm out. And I cannot find the stuff anymore.
So what kind of glue to use? The CA glue at the hardware store is thinner than water and too hard to use effectively. 5 minute epoxy would do well, but is a hassle to mix and build 5 minutes at a time before it hardens. But for lack of anything else, that's probably what I'll have to use. There is Gorilla glue, but applying water to the wood pieces on the construction table is something I'm very wary of. I'm afraid it will cause a little bit of a warping issue.
If someone's got a tube of Ambroid sitting around, got a spare one I can buy from you in a pinch or something?
|
|
|
|
Post by bearcat on Apr 19, 2010 11:33:23 GMT -5
Okay I've got a color scheme finalized for the Sophisticated Lady.
The plane is going to be mostly chrome monocote, but will have purple Ultratrim accents in various places on the fuselage, wingtips and tail. Underneath the wing will be opaque purple Ultracoat, which will make it very visible in the air. The Ultracoat is a lot tougher than Monocote, and will protect it better for its belly landings.
It'll have the following modifications:
Flaps and ailerons. The wingflaps will pivot 90 degrees down maximum, to double as spoilers/air brakes.
The fuselage will be strengthened with carbon fiber and will have a single landing wheel (a la full-size) with a skid underneath.
The plane will also be powered, with a lengthened nose and an outrunner. It will have very ample power...so...
The wings will also be carbon fiber reinforced. Might even use carbon fiber for the leading edge.
|
|
|
|
Post by bearcat on May 18, 2010 9:33:59 GMT -5
Okay, I think this is my next build. I was going to build the Bird of Time first, but the truth is, I already have everything for the Sophisticated Lady purchased.
So, the Sophisticated Lady it is. I'm not sure if I'll build the wings first or the fuselage first. Probably the wings, because when I do the fuselage, I want to incorporate some carbon fiber, or at least fiberglass, into the rear of the fuselage. These planes have skinny tails and with the T-tail, snapping at the fuselage in the rear is a documented problem in hard landings.
When I build the wing, I would like to strengthen it for powered flight. I will also be eliminating the polyhedral that you see in the first photo. That's because this wing will have both ailerons and wingflaps. So it only needs a single angle dihedral, no polyhedral.
Kim had a good idea that I like. He suggested using carbon fiber tube for the leading edge. I actually was planning on a hardwood dowel for the leading edge, just like I did with the Peregrine. That makes this wing almost as tough as a foamy wing. I've seen the Peregrine bounce off the ground without damage.
When Evan went through Kim's sailplane with his, Kim's sailplane had its wing sheared off. 100% balsa construction can't take a midair collision, and not even a hard landing or a collision with a tree branch. Me being a novice flyer (no longer a beginner...yeay!), I like making my wings stronger. I already bought the dowels, so I'll probably use those. We'll see. This kit has laser-cut wood, so I might not be able to modify the leading edge that easily. If not, I can reinforce the wing some other way.
So watch for some pics of the construction process. Should be a really beautiful plane with it's monocote skin making it look like polished aluminum.
|
|
|
|
Post by bearcat on Sept 13, 2010 15:34:05 GMT -5
Here's the progress so far on the Sophisticated Lady. The aileron is custom-built, and is basically like a ball and socket arrangement for the hinging, like what they used in planes of the 40's. This is to prevent flutter. The T-Tail is also completely built and done the same way. Look closely at the leading edge. The balsa leading edge is reinforced for the length of the wing with carbon fiber square rod. I also took the polyhedral out of the outer wing panels, so it only has a couple degrees of dihedral.   And when I ran out of glue, I carved Snoopy for the pilot. Here I'm holding him up in front of Woodstock's plane in my office. Took me about 3 or 4 hours to carve this.  |
|
|
|
Post by Lt Swiss on Sept 29, 2010 17:49:09 GMT -5
Snoopy rocks... great job...
|
|
|
|
Post by bearcat on Oct 12, 2010 12:07:54 GMT -5
Man, the fuselage is kicking my butt! Modifying it for power is pretty hard. I'm almost done. I extended the nose 3 inches so that I don't have to ballast the nose so much. Hopefully, pushing the motor out 3 more inches provides some needed forward moment.
|
|
|
|
Post by Lt Swiss on Oct 20, 2010 14:45:50 GMT -5
Just remember, "Duct Tape Rules!"  |
|
|
|
Post by bearcat on Dec 12, 2010 12:30:27 GMT -5
Okay, basically, the plane is completed. All that's left now are details, fasteners, etc. I had to make my own nose cowl to fit over the motor, and an access panel. I tried making these out of balsa and it was very difficult. So I made a mold using aluminum foil and applied a thick coat of automotive wax, and then used fiberglass. That was messy and took a few tries to get the thickness about right. But it did work. Fiberglass is a good medium to use for stuff like this, but it's a lot heavier than I expected. The two fiberglass pieces came out to be around 1.5 ounces. That's quite a weight in the nose. But it's also very rugged, and will take it on the chin a lot better than balsa would. I've heard of people carving a form out of foam and using that as a mold. I've also heard of carving the shape out of balsa and using a plastic water bottle or something like that, and using a heat gun, getting it shaped around the balsa mold. But that's wasteful of balsa. So my way was messy, but it worked well. I did carve the pilot, who you will recognize as Snoopy. Except he's in his Joe Cool persona. This is solid balsa and then painted. Turned out nice, I think. The balance turned out perfect. If I place the battery right below the wing in that compartment, I can use any size battery I want and it stays under the center of balance. I used a 3-cell, 3300 mah Lipo for this. I shouldn't have to really add any ballast anywhere. I should be able to maintain the balance very closely. I might start covering it today. Or just spend today wrapping up the last few details, such as fastening those fiberglass pieces and cutting down the wing cradle to match the dihedral. I might end up carving the back of the canopy out of balsa where it is supposed to mate with the wing. The plastic canopy is supposed to cut down to match the wing's top, but it wasn't formed right for that. I might make ONE try at melting it to shape using a heat gun, but I don't want to risk ruining the excellent canopy shape by doing so. For this reason, I might just play it safe and do it out of a block of balsa. Still thinking about it. I was going to use rare earth magnets to hold the nose cowl in shape, but I am concerned that the strong magnetic field will interfere with the performance of the electric motor, only a few millimeters away. So I'm going to use another method; probably plain old screws. This plane is going to be silver and purple. I have chrome monocoat to use on most of the plane, but the bottom of the wing will be purple to set the underside a different color when it's 500 ft in the air. And as you can see, this plane has ailerons. The servos are mounted in the wing with 24 inch extensions to the Y-connector. Here's the pic. I have a close-up of Snoopy, but I'll have to add that later. Verizon Wireless is not cooperating this morning. I'll post more pics later as this progresses.  |
|
|
|
Post by bearcat on Dec 21, 2010 10:20:41 GMT -5
Okay, she's covered and I'm rigging the servos and pushrods now, and adjusting all the control surfaces. And wouldn't you know it, every servo is backwards! That's okay, I can just flip the switches on the transmitter. BTW Steve, one of the ESCs I got from you began smoking the moment I put power to it. But I had a spare. Dude, you should check your stuff before you sell...just a suggestion. So here's the pics...  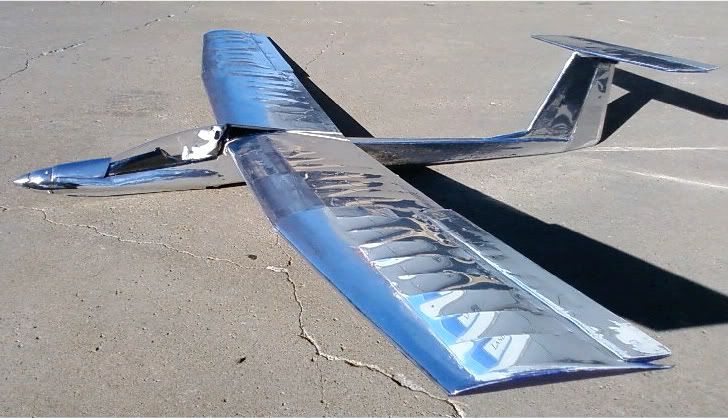 The top surface and the fuselage is chrome monocote. The bottom of the wings and bottom of the tail is purple pearl ultracoat. That way, I can differentiate the plane's position when it's a dot in the sky. Turned out to be about 41 ounces. It's 8.9 ounces per square foot of wing loading. And the motor has 68 watts per pound power to weight ratio. Should be adequate for a sailplane, but certainly NOT a hotliner. For that, I would've needed twice the power and much stronger wings probably. |
|
|
|
Post by bearcat on Jul 11, 2012 12:16:14 GMT -5
It flew! I did have a malfunction. The support for the flexible elevator pushrod broke off inside the fuselage, so I flew it with no elevator! When it went into a decent and I couldn't pull out, I knew something broke, but also saw it was going down in waist-tall prarie grass, so I wasn't worried about it. No damage. Took it home and fixed that pushrod and readjusted things.
I also found out that the 9x5 folding prop is not near large enough to make full use of the motor's capacity. On the wattmeter, it only pulls 7.5 amps. So I'm going shopping for a bigger prop.
|
|


